Docker ile iki ayrı ağ üzerindeki iki ayrı containerin iletişimi
25/01/2018 - DOCKER
Bu örneğimizde iki ayrı ağ yaratıp, her ikisinin içine birer tane container ekleyeceğiz. Buradaki amacımız containerlerden birinin diğerine ulaşabilmesini sağlamak.
Yapı
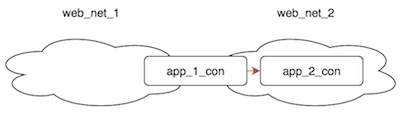
İki tane ağ var - web_net_1 ve web_net_2. İki tane de container var - app_1_con ve app_2_con. Ağ web_net_2 her iki container barındıracak ama ağ web_net_1 sadece app_1_con containeri barındıracak. Container app_1_con ayrıca ağ web_net_2'ın bir parçası olduğu için container app_2_con ile iletişim kurabilecek.
Ağ yaratma
ubuntu@xenial64:~$ docker network create --subnet 192.168.1.0/24 --driver bridge web_net_1

ubuntu@xenial64:~$ docker network create --subnet 192.168.2.0/24 --driver bridge web_net_2
ubuntu@xenial64:~$ docker network ls

NETWORK ID          NAME                DRIVER              SCOPE
7dca476e7b11        web_net_1           bridge              local
9c0f95e63367        web_net_2           bridge              local
ubuntu@xenial64:~$ docker network inspect web_net_1

[
    {
        "Name": "web_net_1",
        "Id": "7dca476e7b11accf19618e887e07a3bf8703aaba779382f101e0516558e983ca",
        "Created": "2018-01-25T13:46:46.586496294Z",
        "Scope": "local",
        "Driver": "bridge",
        "EnableIPv6": false,
        "IPAM": {
            "Driver": "default",
            "Options": {},
            "Config": [
                {
                    "Subnet": "192.168.1.0/24"
                }
            ]
        },
        …
    }
]
ubuntu@xenial64:~$ docker network inspect web_net_2

[
    {
        "Name": "web_net_2",
        "Id": "9c0f95e63367a3442547b301c425f54b15cd44f2748273ac85c288a881c4e6df",
        "Created": "2018-01-25T13:47:02.154334469Z",
        "Scope": "local",
        "Driver": "bridge",
        "EnableIPv6": false,
        "IPAM": {
            "Driver": "default",
            "Options": {},
            "Config": [
                {
                    "Subnet": "192.168.2.0/24"
                }
            ]
        },
        …
    }
]
IP routing
ubuntu@xenial64:~$ route -n

Kernel IP routing table
Destination     Gateway         Genmask         Flags Metric Ref    Use Iface
0.0.0.0         10.0.2.2        0.0.0.0         UG    0      0        0 enp0s3
10.0.2.0        0.0.0.0         255.255.255.0   U     0      0        0 enp0s3
172.17.0.0      0.0.0.0         255.255.0.0     U     0      0        0 docker0
192.168.1.0     0.0.0.0         255.255.255.0   U     0      0        0 br-7dca476e7b11
192.168.2.0     0.0.0.0         255.255.255.0   U     0      0        0 br-9c0f95e63367
192.168.99.0    0.0.0.0         255.255.255.0   U     0      0        0 enp0s8
ifconfig
ubuntu@xenial64:~$ ifconfig

br-7dca476e7b11 Link encap:Ethernet  HWaddr 02:42:7a:85:6e:76
          inet addr:192.168.1.1  Bcast:0.0.0.0  Mask:255.255.255.0
          UP BROADCAST MULTICAST  MTU:1500  Metric:1
          RX packets:0 errors:0 dropped:0 overruns:0 frame:0
          TX packets:0 errors:0 dropped:0 overruns:0 carrier:0
          collisions:0 txqueuelen:0
          RX bytes:0 (0.0 B)  TX bytes:0 (0.0 B)

br-9c0f95e63367 Link encap:Ethernet  HWaddr 02:42:df:44:6d:3c
          inet addr:192.168.2.1  Bcast:0.0.0.0  Mask:255.255.255.0
          UP BROADCAST MULTICAST  MTU:1500  Metric:1
          RX packets:0 errors:0 dropped:0 overruns:0 frame:0
          TX packets:0 errors:0 dropped:0 overruns:0 carrier:0
          collisions:0 txqueuelen:0
          RX bytes:0 (0.0 B)  TX bytes:0 (0.0 B)
...
Uygulama klasörü ve dosyaları
ubuntu@xenial64:~$ mkdir app_1

ubuntu@xenial64:~$ mkdir app_2
Dockerfile - app_1
ubuntu@xenial64:~$ nano app_1/Dockerfile

FROM ubuntu:16.04

RUN apt-get update \
 && apt-get install -y \
    iputils-ping \
 && rm -rf /var/lib/apt/lists/*

EXPOSE 80

CMD ["/bin/bash"]
Dockerfile - app_2
ubuntu@xenial64:~$ nano app_2/Dockerfile

FROM ubuntu:16.04

RUN apt-get update \
 && apt-get install -y \
    iputils-ping \
 && rm -rf /var/lib/apt/lists/*

EXPOSE 80

CMD ["/bin/bash"]
İmaj yaratma
ubuntu@xenial64:~$ docker build -f app_1/Dockerfile -t app_1_img .

ubuntu@xenial64:~$ docker build -f app_2/Dockerfile -t app_2_img .
Container yaratma
Burada containerlara IP adresleri atiyoruz ve gerekli ağlara ekliyoruz.
ubuntu@xenial64:~$ docker run -i -t -d -p 5011:80 --network=web_net_1 --ip 192.168.1.11 --name=app_1_con app_1_img

ubuntu@xenial64:~$ docker run -i -t -d -p 5022:80 --network=web_net_2 --ip 192.168.2.22 --name=app_2_con app_2_img
ubuntu@xenial64:~$ docker ps

CONTAINER ID        IMAGE               COMMAND             CREATED             STATUS              PORTS                  NAMES
84e2bba20bb8        app_2_img           "/bin/bash"         5 seconds ago       Up 3 seconds        0.0.0.0:5022->80/tcp   app_2_con
1fdc83e81490        app_1_img           "/bin/bash"         17 seconds ago      Up 16 seconds       0.0.0.0:5011->80/tcp   app_1_con
Aşağıda'da gördüğümüz gibi her iki ağ birer tane container barındırıyor ama bunu daha sonradan değiştireceğiz.
ubuntu@xenial64:~$ docker network inspect web_net_1

[
    {
        "Containers": {
            "1fdc83e8149090d42b5f635127b54aa406bb0fbf78ce3d9884ec7ae6fb859806": {
                "Name": "app_1_con",
                "EndpointID": "97f39408338ea52f3813700742e05442229b2426d2abd2b65c3405bdcc608b1c",
                "MacAddress": "02:42:c0:a8:01:0b",
                "IPv4Address": "192.168.1.11/24",
                "IPv6Address": ""
            }
        }
    }
]
ubuntu@xenial64:~$ docker network inspect web_net_2

[
    {
        "Containers": {
            "84e2bba20bb8d0e0abd5166eccb416735d3a2e9b932c2771ea0574f3fd3945f5": {
                "Name": "app_2_con",
                "EndpointID": "8373a37662cfebe988897b10b7288e3d4d2d8a2cf135f362dd1dec8fee956ee4",
                "MacAddress": "02:42:c0:a8:02:16",
                "IPv4Address": "192.168.2.22/24",
                "IPv6Address": ""
            }
        }
    }
]
İletişimi açmak
Burada app_1_con container web_net_2 ağına ekleniyor ki sonuçta app_1_con container app_2_con container ile iletişim kurabilsin.
ubuntu@xenial64:~$ docker network connect web_net_2 app_1_con
Aşağıda'da gördüğümüz gibi web_net_2 ağ her iki containeride barındırıyor.
ubuntu@xenial64:~$ docker network inspect web_net_2

[
    {
        "Containers": {
            "0e2ff551a290b4ca2d84c9b282fc99b08cbec7cafef1464ae0df61407b6647fc": {
                "Name": "app_2_con",
                "EndpointID": "925ca5bef3516dca5e0ae4c9c6483ed5bee44d0f3eaa9ce3e7eaf3c6af50e226",
                "MacAddress": "02:42:c0:a8:02:16",
                "IPv4Address": "192.168.2.22/24",
                "IPv6Address": ""
            },
            "af6af1fe06d4909be6c270c146a48c1a141bc6283c9aeadb7fa21d04926556cb": {
                "Name": "app_1_con",
                "EndpointID": "15ae3d50f89e0424d44f80ad43a1b6d257edfd3df1902a2adfd8d3680c2beca9",
                "MacAddress": "02:42:c0:a8:02:02",
                "IPv4Address": "192.168.2.2/24",
                "IPv6Address": ""
            }
        }
    }
]
Eğer containerleri kontrol ederseniz, ağ bilgilerine ulaşabilirsiniz.
Test
Application 1 Application 2 ile iletişim kurabiliyor.
ubuntu@xenial64:~$ docker exec -it app_1_con ping 192.168.2.22
PING 192.168.2.22 (192.168.2.22) 56(84) bytes of data.
64 bytes from 192.168.2.22: icmp_seq=1 ttl=64 time=0.106 ms
64 bytes from 192.168.2.22: icmp_seq=2 ttl=64 time=0.063 ms
64 bytes from 192.168.2.22: icmp_seq=3 ttl=64 time=0.062 ms
64 bytes from 192.168.2.22: icmp_seq=4 ttl=64 time=0.069 ms
64 bytes from 192.168.2.22: icmp_seq=5 ttl=64 time=0.065 ms
Application 2 Application 1 ile iletişim kuramıyor.
ubuntu@xenial64:~$ docker exec -it app_2_con ping 192.168.1.11
PING 192.168.1.11 (192.168.1.11) 56(84) bytes of data.